There are affiliate links in this post.
I’ve received a couple of emails asking me to share a starter routine. I considered sharing my own wavy girl method routine, and probably still will eventually. However, I know that this blog has been getting a lot of people who are brand new to the curly girl method and/or brand new to embracing their naturally wavy hair.
The method I currently use is not how I would recommend most others start out because it’s customized to my exact hair type. If you are more interested in my specific routine, you can see my drugstore CGM wavy hair routine in that blog post by clicking the link.
I thought I’d share an affordable, super simple starter routine that is more likely to work for most people than my specific routine is. I did use this routine n myself to show you guys that it does work for me. Here is my results from the routine that I share in this post:

I don’t love Walmart (or any other big chain, frankly) but I picked Walmart just because it’s got so many locations that it’s accessible to so many people, and it’s reasonable to order these items online for those who are looking to have items shipped right to them.
Some online retailers like Amazon really increase the prices of haircare products, you have to sort of dig for ones that are at their regular in-store prices. Although, I also did make an Amazon CGM starter kit for wavy hair post that includes non-marked-up products available on amazon.
Most haircare items sold on Walmart.com are the exact same that you’d pay when in a Walmart store building, my frugal side really appreciates that. I wanted to provide a really affordable starter routine and I thought Walmart was a good place to start.
I also have a Target CGM starter routine post if you prefer Target, or a dollar tree CGM routine if you’re looking to really pinch pennies. I will do other routine posts in the future for other retailers too.
The reality is, almost everyone changes products once they get going with the curly girl method and learn more about their hair. So starting simple and cheap, with products that are likely to agree with most wavy hair types is the way to go in my view. I have personally used and liked everything I am recommending here.
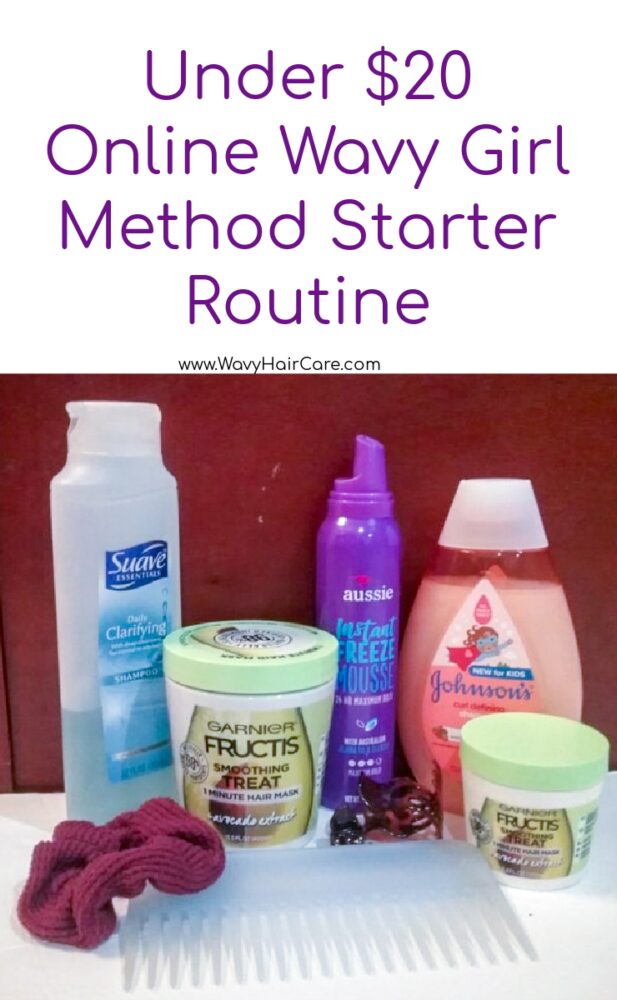
Curly Girl Method Starter Kit From Walmart
Clarifying shampoo. Suave essentials daily clarifying shampoo ($1.94).
Why? This is a really effective clarifying shampoo that is super cheap. Clarifying shampoo is used to begin the curly girl method to strip the hair of any past build-up including silicones. However, you will also want to periodically (about once a month) after starting the curly girl method because you can get build up even if you aren’t using silicones.
Low poo: Johnsons Curl-Defining Kids’ shampoo with frizz control shea butter. ($4.92)
Why? It’s sulfate-free, yet still cleansing, and lightweight (don’t let ‘shea butter’ in the title confuse you, it barely has any in it. It’s a light product. This won’t weigh down most wavy people’s hair, and will be cleansing enough for them.
Can’t find it? Alternative options include Johnson’s Active Kids Clean and Fresh Shampoo, Johnson’s shiny soft kids shampoo, Johnsons kids strengthening shampoo, Not Your Mother’s curl talk shampoo, Not your mother’s matcha green tea shampoo, not your mother’s naturals tahitian gardenia shampoo, Garnier Fructis Curl Nourish shampoo, hask biotin thickening shampoo.
Conditioner: Garnier Fructis 1 minute hair mask with avocado 13.5oz ($5.77)
Why? It can be used as a deep conditioner mask and a regular rinse-out conditioner, so we’re getting two uses in one, here. It is protein-free so no fear of upsetting protein-sensitive hair. It’s moisturizing without being super heavy.
It should be a good moisture level for most who are new to the curly girl method, but even if your hair ends up being very easily weighed down and this is slightly too heavy for a regular conditioner, it’s still great to use as a deep conditioner.
Everyone will find some use for this, making it a really “safe” beginner purchase. Note: There is a big container and a small container in the photo. I just happened to have two and threw them in the photo. You can just buy one. The one linked above is the larger size.
Can’t find it? You’ll need to buy a rinse-out conditioner, leave-in conditioner, and deep conditioner separately. Alternative options for rinse-out conditioners include Johnsons kids strengthening conditioner, not your mother’s curl talk conditioner, not your mother’s matcha green tea conditioner, Native almond & shea butter conditioner, alberto v05 ocean refresh conditioner, hask curl care detangling conditioner.
Alternative options for leave-in conditioners include: Aussie kids moist detangler, carol’s daughter black vanilla leave in conditioner, Garnier fructis curl air-dry cream, Johnsons kids curl defining leave-in, Mielle pomegranate and honey leave-in, not your mother’s way to grow leave-in conditioner, shea moisture manuka honey leave-in.
Additional options for deep conditioners include SheaMoisture Jamaican Black Castor Oil Strengthen Restore Treatment Masque, SheaMoisture raw shea butter deep moisture masque.
Styler: Aussie Instant Freeze Mousse, 24 hour maximum hold. ($3.43)
Why? It has great hold for being a very affordable mousse. This is my #2 favorite mousse overall, and my #1 favorite under $5. Why mousse instead of gel? Mousse is lighter.
Total wavy girl method starter kit cost: $16.06
If you want to try other products, I have a recommended wavy hair products page sharing a variety of products I have used and can confidently recommend, many of which are also sold at Walmart.
Is that it? What about leave-ins? creams? oils? Those 50 other things? Yes, this really is it! It’s best to start simple in my opinion. I personally only use a shampoo, conditioner and a mousse 95% of the time. While curly girl method routines can be very complex, wavy hair can be easily weighed down so adding in lots of products is often a bad idea.
You may be able to learn how to use lots of products in your hair later, but starting with a minimal routine is the best way to learn about your hair in my opinion.
You may ultimately decide you want a curl cream, curl enhancer, curl defining cream or other products. However, if you start simple and see how your hair reacts, make just one change at a time, you can learn what else your hair may need. If you use a bunch of products, or make lots of changes every time you wash your hair, it will be hard to know what is causing your results.
Money Saving Tip!
If you’re going to order online, sign up for Rakuten. They work with all sorts of online retailers (including Walmart.com) and will give you cashback when you spend. It varies by retailer and offers change, but Walmart frequently offers 6% cashback through Ratuken.
If you’re new to Rakuten, sign up with my link and place a $20 order, and you’ll get $20 cash back! This offer is only for new Rakuten members and for people in the US, D.C and Canada only.
If you do this, I’ll earn $20 as well, just to be transparent. I have used Rakuten for years when purchasing across the web on sites like Walmart.com, Target.com, Ebay, SallyBeauty, Ulta and more. Why not get some of your money back, right?
Wavy Hair Accessories
If you don’t have a version of these on hand already, you may want the following wavy hair accessories for your curly girl method journey.
Scrunchies. ($4.88 for an 8 pack on Walmart.com) It’s best to avoid traditional hair elastics as they can dent your wavy hair. Most wavies will sleep on their waves by doing a “hair pineapple” at night which will require scrunchies. My local Walmart sells 2-packs of scrunchies for $0.88 cents but they aren’t available on the website, it seems.
Satin or silk hair bonnet or pillowcase. I prefer a pillowcase as bonnets either are too big and fall off, or are too tight and cause me headaches.
Wide tooth comb or wet brush. To gently work through your hair while in the shower.
Blow dryer with diffuser attachment. Some people air dry on the curly girl method, but as a volume-lover and as someone who has hair that takes forever to dry, a diffuser is a must for me. I have the Revlon Pro Collection OINIC Hair Dryer ($29.99 at Walmart.com) and the XTAVA black orchid diffuser from Amazon.
I’ve never tried any other blow dryer/diffuser combos but I would think most any should work fine. If you purchase a diffuser separately from a blow dryer, double-check the sizing. Not all diffusers fit all blow dryers.
Shower caps. When following the curly girl method, most people only wash their hair a couple times per week. You’l want a shower cap to protect your hair while showering on non-hair-wash days.
A T-shirt. You’ll use this instead of a towel on your hair. I “permanently borrow” mine from my boyfriend. I go for ones he doesn’t wear much anyway. If you can’t find a spare t-shirt though, you may want to buy one.
Is This Routine Curly Girl Approved?
Yes, and no. If you copy the ingredients of these into a curly girl checker like http://www.isitcg.com/, it will say these items are approved. However, the strictest form of the curly girl method says to use cowashes for cleansing, and doesn’t approve of low-poo.
However, most people with wavy hair will find cowashing too heavy, so most of us don’t follow the strict curly girl method in that area. Instead we do the ‘wavy girl method’ which allows for sulfate free shampoo (aka “low poo”).
Simple Wavy Hair Routine Day 1
My goal is to keep the routine easy as well. Routine is at least as important, if not more important, than what products you use. Too many people expect that the way to get their “goal hair” is to just find the perfect products, but it won’t happen unless you find the right routine and techniques, too. Routine is so important.
So, even a simple wavy hair routine can feel lengthy. However, I promise this routine isn’t as complicated as it might look at a glance. I am being as detailed as possible for the sake of clarity.
These are the routine instructions for your first wash day of following the curly girl method which is why it involves a clarifying shampoo and a deep conditioner in steps 2 and 3. These steps will be different on regular wash days. This is an upside-down styling routine, designed to encourage volume.
- Wet your hair in the shower.
- Use the Suave Daily Clarifying shampoo by rubbing it into your scalp. You don’t need to scrub it into your strands, it will clean your strands as it filters down from your scalp. Once you’ve thoroughly rubbed your scalp with the shampoo, rinse it out completely. This was your “clarifying wash” step that you do when starting the curly girl method, not a regular wash day step.
- Generously apply the Garnier 1 minute mask all over your strands from root to tip but try to avoid your scalp. Your hair should feel quite saturated with conditioner. I’d use a generous handful for my hair. Run a wide-tooth comb or wet brush through your hair gently to detangle and align your hair. Allow the conditioner to sit on your hair for about 5 minutes. This is a deep conditioning treatment because you’re using more conditioner and leaving it on longer than usual to add moisture back to your hair. You’re doing this because you used a clarifying shampoo which is a bit harsh on the hair.
- Near the end of the 5 minutes, bend over in the shower so your head is upside down, with your head part way under the water. Squish to condish. What is squish to condish? Check out this video from 4:00 to 5:00 to understand what Squish To Condish is.
5. Once you have done squish to condish, rinse the Garnier conditioner out and turn the water off, while keeping your head upside down.
6. Still upside down, place the nails on your index fingers in front of each ear. Use your nails or tips of your fingers to draw a part in your hair from your ears up to the crown of your head. The goal here is to part your hair so that the front of your hair and the back of your hair are separated from each other. I know it sounds weird, but this is important before the next step, which will help your waves/curls form into “curl clumps”. We don’t want the back of your hair to form curl clumps with the front of your hair, as that would be messy once it dried.
7. “Squish” your hair gently, this time your goal is to squeeze excess water out of your hair, while also allowing your waves/curls to form. Just once or twice over each portion of your hair should be enough.
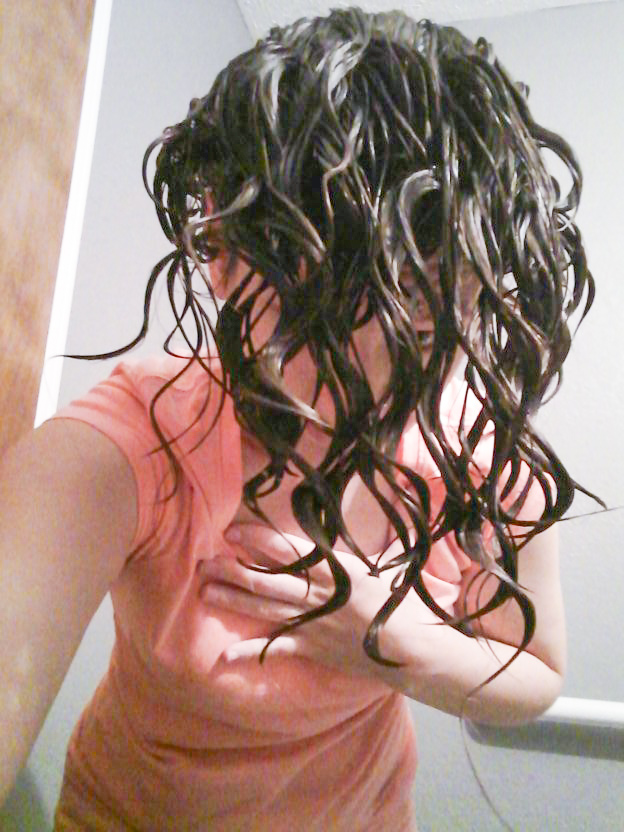
This is what my hair looks like after scrunching. Yours may vary a bit depending on your wavy hair pattern, they might be straighter or more curly, but your hair should be in “curl clumps” with clusters of hair snuggling together, not individual loose hairs everywhere.
8. Apply mousse to all of your hair. Squirt the mousse into your hand, rub your hands together to coat your hands in the mousse, then gently run your hands over the sides of your waves to lightly coat them in mousse. This is called “glazing” if you’d like to look it up to find a visual. If you flatten your waves at all while doing this, gently squish them to help them spring back up.
Try to get all the way up your strands without touching your scalp. You will have to experiment with how much mousse is right for your hair. For my hair that is just above my shoulders, I use about 2.5 handfuls of mousse. When my hair was armpit length, I used 4 handfuls.
However, my hair is very dense. If your hair is thin or lower density, you may need to use less than 1 handful for your entire head. So the first time, just try to estimate based on your hair density and length, but know you are likely to miscalculate the first time. That’s just a necessary part of learning your hair.
9. Plop your hair using a t-shirt. Check out my how to plop your hair tutorial to learn how this works. Set a timer for 5 minutes.
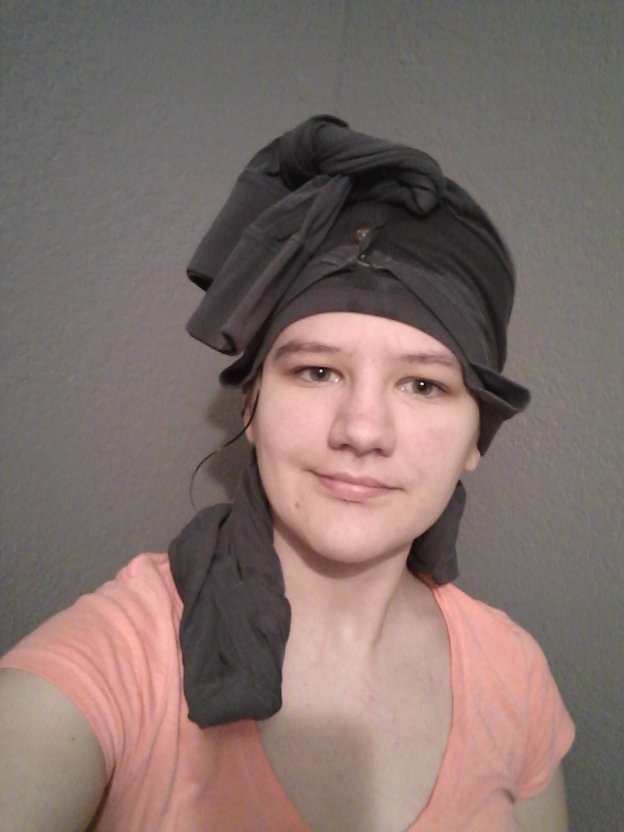
10. Flip your head upside down before you remove your plopping t-shirt, so that your hair will fall upside down when it’s removed. Then try to gently hold your waves while you flip your head upright, so they aren’t disrupted too much.
11. Take a look at your waves in the mirror. If there are any really wild pieces, try to flip them into a more natural position. If they are feeling a bit dry and don’t want to re-position, you can dampen that area with a bit of water to try to reposition it.
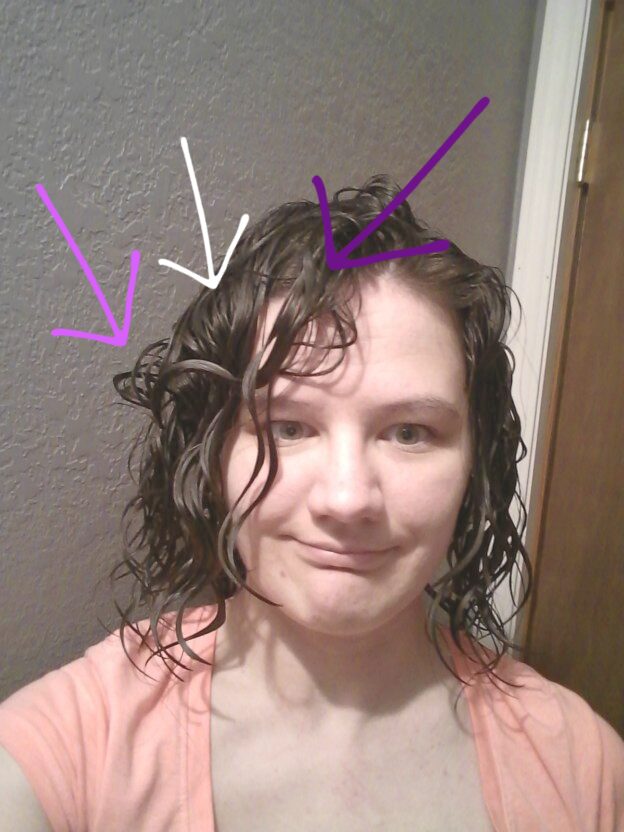
When I flipped upright, I had a few weird strands. I had hair in my face (dark purple arrow). I had a wave from mid-back on one side pulling abnormally far forward (white arrow), and I had a piece far in the back that was just angled weirdly sideways (light purple arrow).
I dampened these with water, and gently squished them from below to help them find a new ‘home’ in a more natural position. The picture below is after I corrected these areas.

12. Diffuse if you have a diffuser, or air dry if you don’t. Diffusing tutorial here, if you need one. Try not to touch your hair as it dries, as touching your hair as it is drying can introduce frizz. Your hair should start to feel hard or crunchy as it dries – don’t worry, this is what it is supposed to do, but your hair will feel better once this is all done!
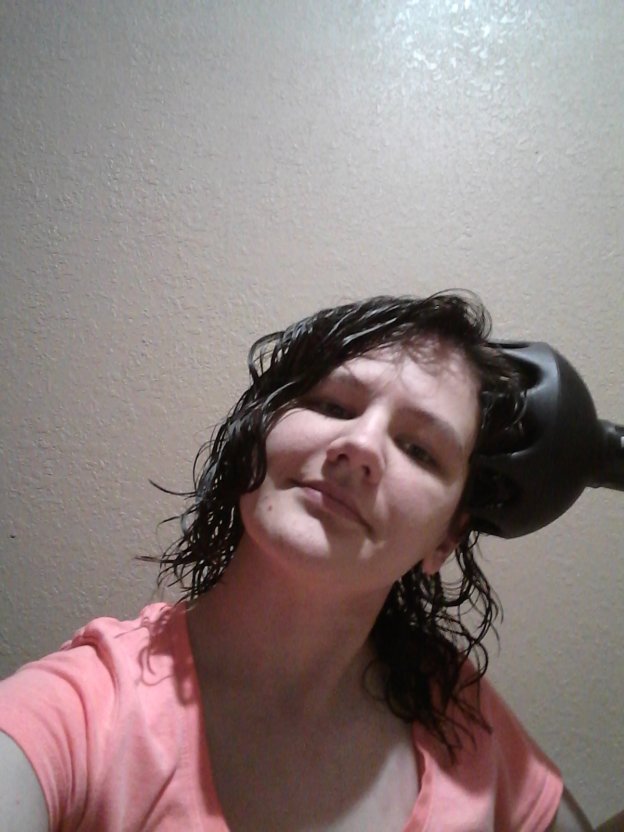
13. Wait until your hair is 100% dry. You’ll know it is dry when all areas of your hair feel the same temperature. If you think your hair is dry and any area feels cooler than the rest, that area is still wet, and you’ll want ot wait longer. Even once you think you know your hair is 100% dry, I’d recommend waiting a bit longer just to be absolutely sure.
14. Scrunch out the crunch. If you used the right amount of mousse, you should have a hard feeling over all of your hair. This is called a gel cast or mousse cast, you can click that ‘gel cast’ link to see my whole blog post about gel/mousse casts. You can get rid of the crunch by gently squeezing your hair.
That’s it! Your first day of the wavy girl method is complete!
To protect your hair overnight, check out my post how to sleep on wavy hair.
If you want to “Refresh” your hair on day 2 and beyond (meaning on non-wash days) check out my post how to refresh wavy hair with water for a great beginner tutorial for refreshing.

My hair while still in a cast.
Simple Wavy Hair Routine Regular For Wash Days
Your future wash days (after wash day 1).
Your first wash day you did a clarifying shampoo and a deep conditioner. You do not need to do those every time you wash your hair, so you skip those for regular wash days. For your 2nd (and additional) wash days, make the following adaptations to the routine listed above.
Edit to step 1: Instead of using the Suave clarifying shampoo, use Johnson’s Curl Defining shampoo. I use about a quarter amount for my hair.
Edit to step 3: You’ll use the Garnier 1 minute treat again, but last time you applied it very generously and left it on for 5 minutes so that you could use it as a deep conditioner. This time, you’ll use a smaller amount. How much will vary depending on the length and fullness of your hair. I would use about a half dollar amount in my short, but very full hair.
Instead of leaving it on your hair for 5 minutes, just let it sit for about 1 minute. The rest of the routine is the same as on the first wash day.
That’s it! Now just take note of your results to get a sense of what is and isn’t working for your hair. Most likely, your first change will be the amount of mousse to use. If you didn’t get a hard cast over your whole head, use more mousse on your future wash day. If your hair was left sticky or felt very heavy/producty, then use less mousse the next wash day.
If you continue with this exact routine, you’ll want to clarify and deep condition your hair (doing the “day 1” routine) about once a month to reset your hair from buildup. All other wash days, you’ll use the Johnson’s shampoo and the lesser amount of Garnier conditioner, left on for only 1 minute.
Beyond that, just keep taking notes of what is and isn’t working for your hair and learning as you go. Joining a wavy hair community can be a really helpful place to get specific feedback or advice.
Nobody’s hair is exactly the same so you’ll likely want to experiment with various techniques (like air drying vs diffusing, rightside up vs upside down styling and more) to learn what you like best. Check out my wavy hair blog post directory to see a list of all my blog posts by title.
Feel free to leave me questions and I’ll try to reply with answers and/or create new content to help you out.
Do you think these products would be good to use on color treated hair? If not do you have any recommendations for what to use?
My hair wave is 2A with high porosity, medium density and fine. My hair is currently about to my mid back. The top half of my head is straighter than the bottom half. (which often leads it to looking like a hot mess) It is super wavy when it is wet but tends to flatten out and frizz a bit as it dries.
My attempt with this post was to share products that are sort of likely to give decent results to a lot of people in an affordable way. I think if you were to use these products they would be alright, but you’d need to work protein treatments in regularly because your hair is high porosity.
Also this conditioner is a little heavy even for my normal-thickness strands so with yours being fine, it may weigh you down a bit.
So my recommendations for you personally would be to swap out this johnsons curl shampoo (pink bottle) shampoo for the johnsons strengthening shampoo and conditioner (light purple bottles) as those have a little protein in them which your high porosity hair will benefit from, yet they are still really light products so they shouldn’t weigh your hair down even though your strands are fine.
Even with protein in your shampoo and conditioner, high porosity hair will likely also need protein treatments still. I’d suggest starting with maybe twice a month protein treatments and then do more or less frequently depending on how your hair reacts to twice a month. To do a protein treatment you could buy something like Hask protein packets (They’re pink and around $1.75 at my local Walmart and grocery store) and skip the Garnier listed in this post.
So to summarize that I’d suggest:
Suave clarifying shampoo for your reset wash and clarifying periodically. (~$1)
Johnsons strengthening kids shampoo & conditioner for regular wash days. (~$5 each)
Aussie instant freeze mousse as your styler (~$3.50)
Hask protein packets instead of deep conditioning with the Garnier. (~$2)
As a cheap Walmart starter kit for high prosoity, fine hair.
If you try this set and your hair feels a bit rough, you may need to add in a leave-in conditioner. I have tried a handful of leave-ins but none that I liked enough to recommend..so if you find that your hair doesn’t feel soft between washes, I’d look around online for someone with fine high prosity hair who can recommend a leave-in conditiner to you. 🙂
This mousse has a really good hold so hopefully it will help hold your waves well as they dry and preserve their pattern better than you’re used to seeing. I’d try to aim to use enough mousse to get a hard cast. If I don’t get a hard cast, I lose a lot more wave/curl than when I get a cast.
If you’re new to the idea of a cast this post might help: https://wavyhaircare.com/what-is-a-hair-cast-or-gel-cast-how-to-create-one/
Good luck 🙂
Thank you for the advice, I’ll look into what you recommended.
what if I have fine but really curly hair do I use the same method as for wavy hair? and I do have a lot of hair it’s just fine and it’s a bit past my shoulders and almost to the middle of my back, it is layered
Sometimes really fine but curly hair can do well with wavy hair techniques, as fine curls can often get weighed down easily like wavy hair does. However, curly hair is generally more dry than wavy hair, so you might have to add in more moisturizing (yet still lightweight) products than some people with wavy hair.
I think you just changed my life! I used my regular shampoo and conditioner but all the rest of the method and holy cow my hair is wavy! I just scrunched out my crunch after air drying and I’m simply amazed. How many times in my life have I attempted to give myself “beachy” waves with a curling iron, braids, or rollers and all I needed was some freaking mousse?! I’m excited to see the waves get more defined as I keep this up. It honestly wasn’t that hard. I must be lucky my hair doesn’t need a lot. Thank you!!
Aww that’s so cool! I felt similarly a few years back. I couldn’t believe that my hair could be wavy without me realizing it, yet it made so many things (like the poofy, frizzy and general “unruly straight hair” problems) suddenly made more sense.
Thank you! I just discovered that my daughter’s spiral curls are actually waves since they don’t start at her scalp. I’ve been trying to figure out products that will work better for her than what I’ve been trying to use. This information is outstanding!
Hi I found your post and wanted to give this a try. I have low porosity fine but thick hair that curls in the rain and tends to take whatever shape of its container, i.e. it has lots of body and holds for days after sponge rollers but unpredictability and falls immediately with hot rollers . It is shoulder length. I am posting this to see if you have a conditioner you’d recommend. I have food allergies and was able to find a Garnier aloe conditioner mask similar to the one you used but had to go all over town to find it and eventually bought it online because these was no other way. I am allergic to most tropical fruits so the Garnier banana, coconut, and other fruits like mango won’t work. The Target conditioner you recommended is also not possible. Any recommendations for another daily non wash day conditioner both easy to find and cheaper would be very helpful long term.
Unfortunately, I haven’t researched much about what hair products are free from coconut and fruits, etc like you mentioned. I did find these on a quick google search, I didn’t read through them but hopefully they’ll get you started on a path to finding something that works for you?
https://curltalk.naturallycurly.com/discussion/182498/best-coconut-free-products
https://www.reddit.com/r/curlyhair/comments/dbtd00/where_my_glycerin_free_aloe_free_coconut_free/
Wow, you came prepared with all the information, hahah! I’m excited to give this a go and see how my hair reacts. I’ve definitely noticed throughout my life, that my hair has some kind of texture to it. It tries to be wavy in ways, very loosely. And sometimes even tries to curl, but it’s always random, and seems very weak.
But I do remember a time when I lived in Florida, and I had taken a shower, washed and conditioned my hair, then went straight outside without brushing it or anything, let it air dry. Didn’t touch it at all, and wow! The waves I had were so pretty! But I was never able to recreate that again. I always thought I just had unruly, poofy, frizzy, just untamable straight hair. This all is making a lot more sense now.
Thanks for all the information!
I’ve heard others say that when traveling to Florida! I believe it’s how humid it often is down there that really helps some people’s curls spring up. I’ve also heard of people who lived in Florida as kids but then moved away being surprised at how much straighter their hair would look in drier climates. So interesting. 🙂
Hello! I first found your blog when I started my curly hair journey. I didn’t know my hair was curly. I always thought I had unruly tangled hair, but I started small and over time, my hair care journey was flourishing. My hair is the best it’s ever been. After years of hating my hair, I can finally say I love it.
I guess my question was, if you can do an updated Walmart list?
I live literally out in the middle of nowhere. I got a DG about 15 minutes away from me, and a Walmart that’s an hour away. I usually order my hair stuff online but it can take a while to get here. I went with a friend to the Walmart, and I noticed they redid the hair section. The avocado leave in wasn’t anywhere to be found, and I noticed a lot of newer products I’ve never heard of before. I was pretty overwhelmed and ended up leaving with nothing.
I appreciate your help so much already.
I’m so glad you found some of my content helpful! I am sorry that it took me so long, but I finally updated this article so it now includes alternatives for the garnier fructis treat. It has become hard to find, but Garnier is still listing those products on their site so I don’t think they are discontinued…I’m not sure why stores aren’t stocking them. Sadly, I don’t know of any similar ‘3 in 1’ products so I had to share a variety of different suggestions for regular conditioners, leave-in conditioners, and deep conditioners in the place of the 3-in-1 mask but I hope it’ll be helpful to people.
Thank you so much for such a thorough and thoughtful website on this subject. I’m just starting experimenting if I have enough wave (I think I do! yay!) to make this my new hair style. So thanks for all the helpful tips and detailed steps to get the best results, before going all-in and spending a fortune.